Learn to build your own Bob Beck Parasite Zapper with an easy to follow instructional guide.
Parts List –
1 x bread board
1 x LM358 Dual Op-Amp
1 x 2.2M ohm resistor
1 x 150k ohm resistor
2 x 100k ohm resistor
1 x 820 ohm resistor
1 x 0.1uF tantalum capacitor 50 volts
2 x 18v 500mW zener diodes (1 watt is OK too)
1 x bi-colour LED
1 x 22uF electrolytic capacitor >35 volts
1 x 100k potentiometer
thin wire for links
3 x 9 volt battery snaps
3 x 9 volt batteries (rechargeable is fine)
speaker wire for output cables
some heatshrink or electrical tape
all of these components can be found at https://mouser.com or, https://digikey.com
Extra items required for the electrodes –
2 pieces of silver rod, or stainless steel rod made from a kitchen skewer, or prongs of an old fork about 50-75mm (2-3″) long
some cotton cloth (or cotton makeup removal pads) to make cotton sleeves for the electrodes.
some cotton thread.
If you have bought a kit you will not need to make an output cable as one is supplied. If you have bought a kit, use 2 of the link cables provided, and insert them into the bread board as per the illustration below. These are the output cables. Connect the electrode cable provided to the ends of these. They are bipolar, which means it doesnt matter which way around the wires go. Refer to the Bob Beck documentation found here to create cotton pads for the electrodes. Refer to page 21 (Placement of Probes (Electrodes)) – read to page 24.
Original Schematic

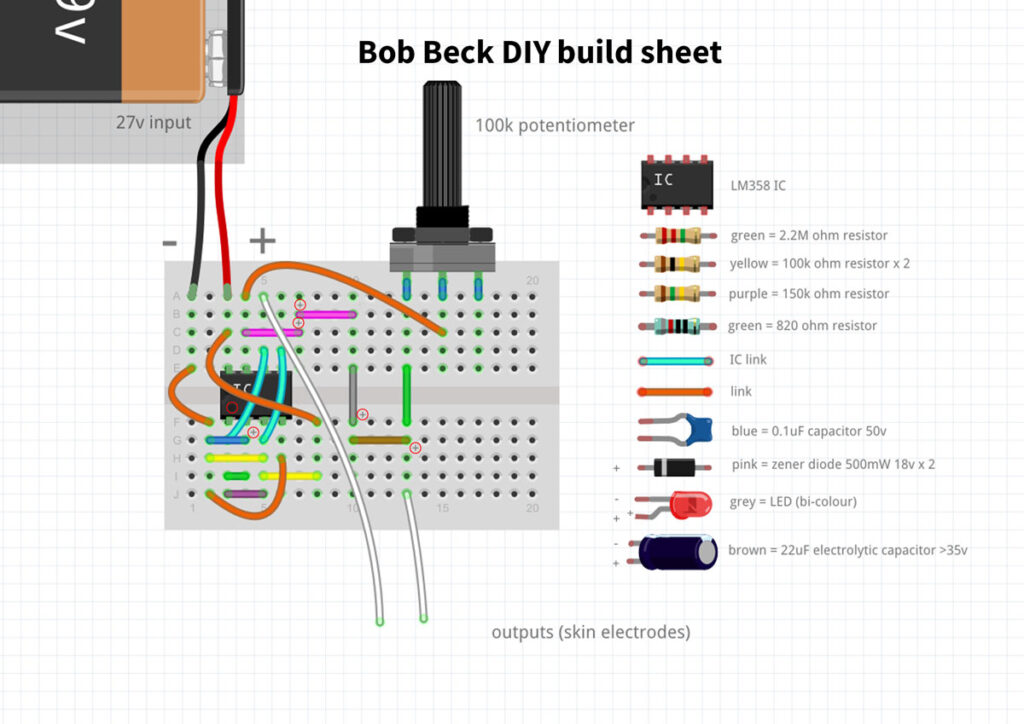
Please take note of the polarity ( + or – ) of the 0.1uF capacitor. This is essential for your device to work. Also take note of the polarity of the 22uF capacitor and the LED – if you place them around the wrong way, the device will still work but the output indicator section of the circuit (flashing LED) will not flash. The 2 diodes must also be installed with the correct polarity. The left hand diode must have the stripe to the left, the right hand diode – the stripe to the right, refer to the image above.
The 22uF capacitors negative polarity is indicated by the stripe down one side. If you zoom in on the image you will notice on the bread board itself where the positive leg should be placed. The LEDs negative polarity is indicated by the flat side on the bulb itself, the long leg is the positive. The resistors polarity does not matter.
Two things that are absolutely crucial, are the correct orientation of the IC and the correct polarity of the battery input. If either of these are incorrect and you plug the batteries in, you will fry the IC (LM358). On the IC you will notice either a small notch on one side, or a circle on the casing. This MUST go to the left. Please ensure the polarity of the batteries are correct as per the image.
To join the 9v battery snaps wiring together – hold one red wire of one snap and join it to the black of a second snap by twisting the wires together. You may strip away more of the outer wire casing if you wish. Join the red of the second snap to the black of the third snap. Twist together. These connections then need to be folded back over the wire and then isolated with either some tape, or heatshrink. You will end up with one red wire exposed and one black. Place accordingly.
Dont cut the ends of these 2 wires. they are already soldered and will slide into the bread board socket perfectly. If you find that the battery snap wires do not stay in the bread board, you may need to strip some extra cable and twist and fold it over itself in order to make it thicker, or get a small piece of paperclip and wind the wire around it. Heatshrink and/or tape these 2 connections.
The polarity of the electrodes does not matter. If you are creating your own electrodes – make sure they are made out of .999 silver or stainless steel. Do not use any other metals. You may create stainless steel electrodes quite easily by using 2 prongs of an old fork, or a stainless steel skewer cut down to 2 x 35-40mm (1 1/2”) pieces.
To make an extension from the unit to the electrodes – cut a length of stereo speaker cable. Expose at least 50mm (2”) of the internal copper wire and twist it. Then wrap the wire tightly around the stainless steel rods. Fix the exposed wire to the electrode with either some electrical tape, or heat shrink. If you are building from the DIY kit, just place the ends of the electrode cable into the breadboard as shown above..
Create some cotton sleeves for the electrodes from a piece of cotton or wool – do not use any synthetic materials. Wrap the cloth around the electrodes and then fasten with some cotton thread wound around the cloth and finished with a few knots.
You are ready to go. Connect the batteries to the unit and test by touching the 2 electrodes together (without the cotton sleeves). If the light is not flashing adjust the potentiometer. If the light is still not flashing refer back to the build sheet diagram and ensure everything is in the right spot. Once you have the unit working – place the cotton sleeves back onto the electrodes and wet with some salty water. Place them over the radial and ulnar arteries as described in the Bob Beck documentation (found here page 21-24), and fasten with an arm band. Ensure the skin between the electrodes is dry, so that no short circuit is created. Adjust the potentiometer and the electrodes until you can feel a pulse. Adjust the pulse until it is comfortable for you, there is no need to over do it. Make sure to maintain moisture on the electrodes.
Happy Healing!